The State Immunization Registry
Overview
The Meaningful Use Stage 2 objective was to provide the capability to submit electronic data to immunization registries or immunization information systems, and actual submission except where prohibited, and in accordance with applicable law and practice. Even though this measure is by the Eligible Provider's Attestation, the software still needed to be able to extract this data to be submitted as per the measures criteria:
Successful ongoing submission of electronic immunization data from CEHRT to an immunization registry or immunization information system for the entire reporting period (where registries can accept electronic submissions).
This document is to describe the setup, data entry and the data extract in Net Health Employee Health and Occupational Medicine in order to meet the NIST measures criteria 170.314(f)(1) and 170.314(f)(2).
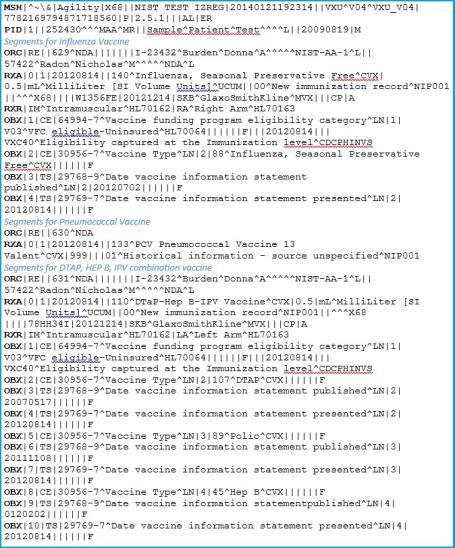
This export utility has been designed to work in accordance with the published CDC requirements, using the HL7 (Health Level 7) national standard for reporting immunizations. The utility will not work for any state registry that cannot accept this basic standard format.
It is the responsibility of the client organizations utilizing this functionality in Net Health Employee Health and Occupational Medicine to manage your relationship with your respective state, and complete tasks needed to have the utility work properly. These tasks include:
- Setting up the database tables and employee demographics to capture the correct codes and required information.
- Capturing the correct information when administering vaccinations.
- Executing the export utility on the time basis required by their states (e.g., monthly).
- Sending or transmitting the data files to their states.
- Communicating directly with your state to handle any problems or questions.
Setup
CPT Codes
Setup up CPT codes for each immunization that will be documented within Net Health Employee Health and Occupational Medicine. Link the CPT code with the corresponding Immunization/Vaccine(s) medical activities.
From the Home NAV bar
- Select Setup/Admin
- Select Medical Codes
- Select CPT-4 / HCPCS Codes
Update any vaccines that are missing from the list of CPT codes

Declination Codes
Setup up Declination codes to be used whenever a patient refuses a vaccination. These codes must have the appropriate codes attached to them in order for the data to be submitted in the HL7 message
From the Home NAV bar
- Select Setup/Admin
- Select Medical Codes
- Declination Codes
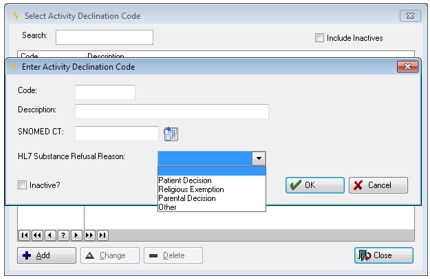
Enter codes that pertain to each of the Refusal Reasons shown on the drop down list. The user will be able to select from this list of codes if a patient refuses a vaccine and then that information will be submitted in the immunization HL7 message to the registry.
Medical Activity
To track each vaccination, setup up individual medical activities for each.
General Tab
The medical activity must be set with the following fields on this tab in order to qualify the vaccine to be extracted and to identify the type of Vaccine in the HL7 messages that will be extracted for the State Registries.
- Activity Type field set to Vaccine/Immunization.
- Trigger Entry field set to Drug Dosage / Lot.
- CVX Code field used by the CDC to identify the Vaccine. A complete list can be obtained from the CDC's website.
- CPT Code is linked to the CPT code table that was described above for this setup. These codes are required in the setup so that the vaccines will be extracted for the registry HL7 messages.

Drug Dosage Tab
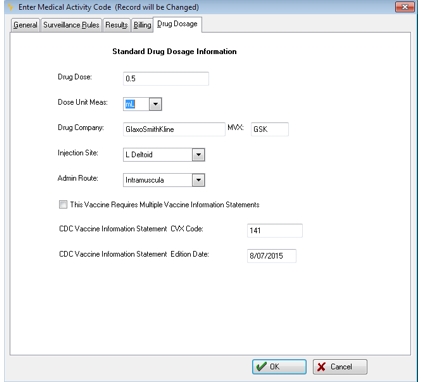
Default field values to be populated when entering results for a vaccine are captured on this screen of the medical activity setup. This is to save time for the user during data entry for those fields that will always contain the same information.
- Drug Dose field is the default amount normally given to the patient for this vaccine.
- Dose Unit Meas field is the default value for the dosage measurement.
- Drug Company field is the default value of the vaccines Manufacturer Name contained on the inventory of the vaccine you are administering.
- MVX field is the default value of the vaccines MVX code which is a 1-3 digit code assigned by the CDC to identify the Manufacturer of the vaccine. Enter the MVX code that applies to the inventory of the vaccine you are administering. There is not a setup table for these codes, it is a free text entry field. This field must be entered with a valid MVX code. Any invalid codes will cause this data field to not be sent in the HL7 message and may reject the vaccine from processing into your state registry. See the valid code table in Appendix A.
- Injection Site field is the default value of site where the vaccine is usually administered for your population of patients.
- Admin Route field is the default value of the route where the vaccine is usually administered for your population of patients.
- CDC Vaccine Information Statement CVX Code field is the CVX code to identify the vaccine information statement that was given to the patient whenever a vaccine is administered.
- CDC Vaccine Information Statement Edition Date field is the edition date on the information statements that are given to the patients whenever a vaccine is administered.
Multiple Vaccine Components
If a vaccine has multiple components, then the Information Statement CVX Code and Edition Date must be captured on the Medical Activity setup. To do this check the This Vaccine Requires Multiple Vaccine Information Statements and the following window will display:
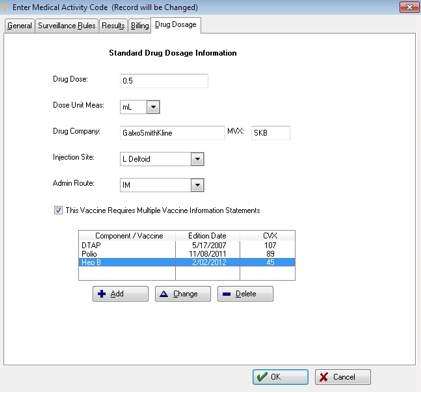
The Vaccine components will be defined with each VIS Information Statement CVX code and Edition Date. This information on this setup will be populated as the defaults on the Dosage tab of the medical activity whenever this type of vaccination is documented for a patient.
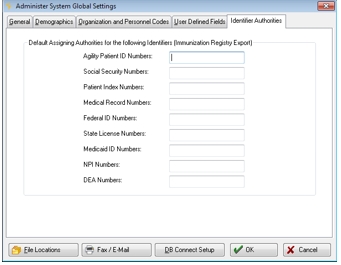
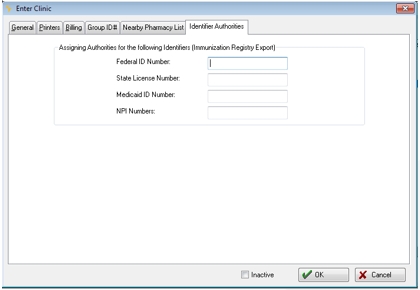
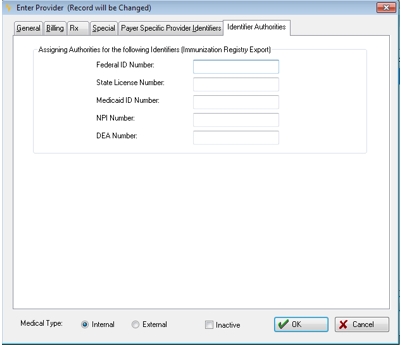
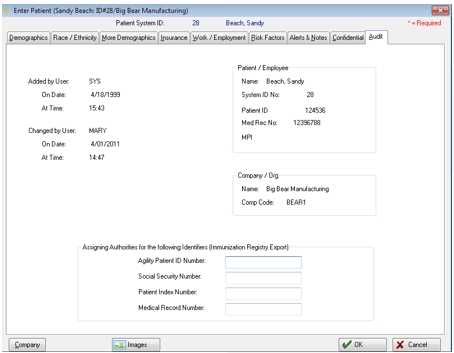
Identifier Authorities
These are assigning authorities to be associated with the different identifiers that are sent in the HL7 messages. Each state may require certain values to be sent in the HL7 message and these are the fields that can capture this information. These can be defined at a global level on the System Admin Parameters, Identifier Authorities tab or can be overridden for different identifiers for the individual Clinics, Providers or Patient Demographics levels.
System Admin Parameters Setup
Clinic Setup
Provider Setup
Patient Demographic Setup
Immunization Data Entry
The Immunization Registry Export can create separate files based on the state, clinic or ordering provider. This will be determined based upon the way that your organization is registered with your state's registry.
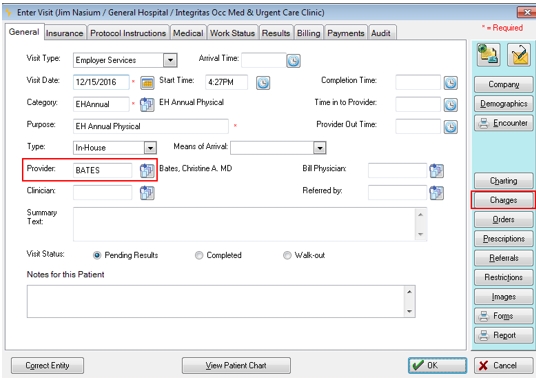
Log a Visit
Log a Visit and enter the Ordering Provider in the Provider field.
NOTE: Visits are required to be entered if your organization is registered with your State's Registry by ordering provider or your State Registry requires an ordering provider to be sent in the HL7 messages. The visit's Provider field captures the ordering provider that is sent in the HL7 message. If the ordering provider is not a required data element to be submitted for your state registry, then a visit is not required to be entered.
Medical Activity Results for each Immunization
- Click the Charges button and enter a medical activity results record for each immunization that was administered by your facility.
These are normally recorded as services that were performed during a visit but can also be entered as documented history from the View Chart, Surveillance tab without being associated with a visit.
NOTE: If your organization is registered with your State's Registry as an organization, then the medical activity results do not have to be entered with a visit. The only time a visit is required to be entered is if the ordering provider is a required data element to be submitted in the HL7 message for your State Registry or if you are billing these services from the Net Health Employee Health and Occupational Medicine software.
- Add the Medical Activity for the vaccine that was administered.
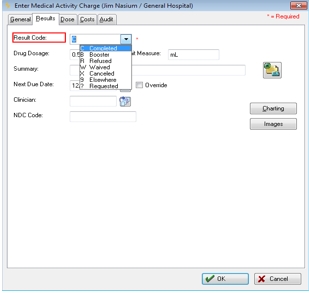
- Click the RESULTS tab and select a Result Code (required field) from the drop down list. Any vaccines with a result code of X (Canceled), W (Waived), or ? (Requested) will not be included in the registry extract.
If a Refused result code is selected, the window will display a Refused Reason field for entry.
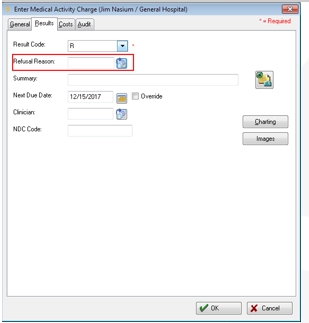
Click the lookup icon to select the refusal reason from the Declination Codes table.
- Clinician (required field): select the clinician that administered the vaccine to the patient.
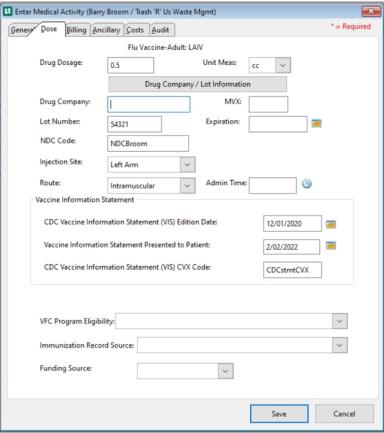
- Click the DOSE tab to enter the vaccine dosage data normally required to be sent for your State Registry.
To eliminate any missing data from the HL7 messages, we recommend completing all the fields on this window even though the fields do not require an entry. This will avoid any rejections that would require a user to have to go back and correct the data and then re-submit them again to your State Registry.
The defaults for the Vaccine Information Statements will display from the Medical Activity setup. Anyone of these fields can be changed by clicking the change button. If the Medical Activity was not setup with any defaults values for the information statements, then this area will display blank and the user will have to Add each of the Vaccine Information Statements individually.
- The default values that were entered on the Medical Activity setup will automatically be populated to save the user time during data entry. This includes the following fields:
- Drug Dosage and Unit of measure
- Drug Company and corresponding MVX. There is not a setup table for the MVX codes, it is a free text entry field. This field must be entered with a valid MVX code. Any invalid codes will cause this data field to not be sent in the HL7 message and may reject the vaccine from processing into your state registry. See the valid code table in Appendix A.
- Injection Site
- Route
- CDC Vaccine Information Statement Edition Date
- CDC Vaccine Information Statement CVX Code - populates only if there is a statement date.
Any one of these fields can be changed if different for an individual administration of a vaccine.
- Lot Number and Expiration Date - The user will enter this data from the vial of the medication being injected.
- NDC Code - Enter the NDC code of the Vaccine administered.
- Admin Time - click the clock icon to record the time the vaccine was administered.
- VFC Program Eligibility - click the drop down list and select the appropriate VFC eligibility.
- Immunization Record Source - click the drop down list and select whether the immunization is being documented as a new or existing immunization. If left blank, it will default to a new immunization during the immunization registry file extraction.
- Click OK to save the record and continue with workflow to complete the visit.
- Ifrecording a Dosage for a vaccine with multiple components the Medical Activity Dose tab will display as follows:
The defaults for the Vaccine Information Statements will display from the Medical Activity setup. Anyone of these fields can be changed by clicking the change button. If the Medical Activity was not setup with any defaults values for the information statements, then this area will display blank and the user will have to Add each of the Vaccine Information Statements individually.
Immunization Registry Export
As part of the ONC 2014 Edition criteria for a Complete EHR Stage 2 Meaningful Use Certification we have included the capability for sending immunization data using the approved standard HL7 2.5.1 version format. Each immunization will be sent in the file using the industry standard CPT and CVX coding to identify the immunizations.
Creating the Immunization Registry Batch
Click the Utilities button.
Click Immunization Registry Export button
The following selection window will display:
Export and Reporting Options tab
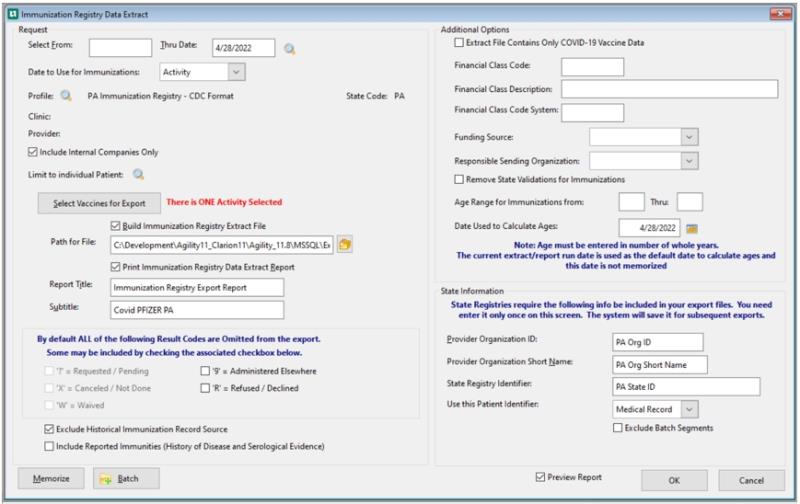
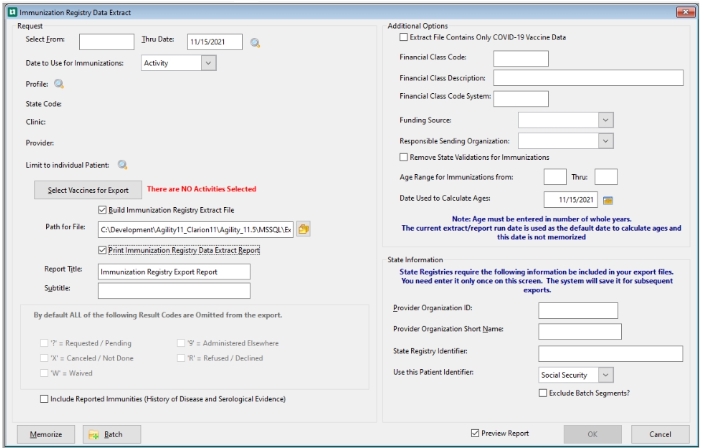
This selection window can be memorized once completed and then setup in a Batch so that the files will be processed and generated on a regular schedule without user intervention.
Select From/ Thru Date: Click the icon beside the date field and select the appropriate time period, i.e. today, yesterday, and this week. Actual dates will not be required to be entered for the memorized report. Dates would only be entered if running an on demand extract for a specific date range. This time period will extract the data within the period selected based on the current date when the extract is run.
Date to Use for Immunizations: Select a date from the dropdown menu which will be used to send immunization data. The options include:
Activity - Selecting "Activity" for the date to use will result in any immunizations with an activity date that is contained within the date range to be included.
Add and Change- Selecting "Add and Change" for the date to use will result in any immunizations that have an Add or Change date that is contained within the date range to be included.
Add - Selecting "Add" for the date to use will result in any immunizations that have an Add date that is contained within the date range to be included.
Change - Selecting "Change" for the date to use will result in any immunizations that have a Change date that is contained within the date range to be included.
Profile:Click the magnifying Glass icon to select or create a export profile. The following window will display:
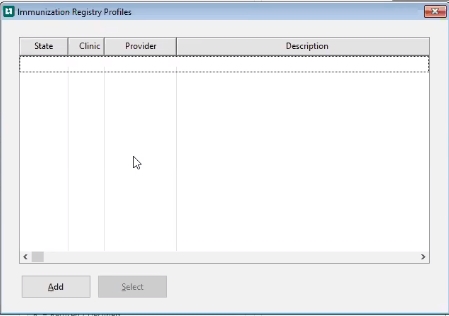
Add: Click Add to create a new profile:
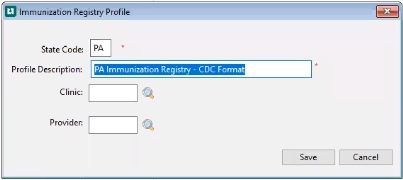
Enter your State: The Immunization Registry export files can be created and separated by State. The user enters the appropriate state on the selection screen for the file to be created. The system will then export any data that was entered for those clinics which are located in the selected state.
Enter a Profile Description: This will identify the profile you create. It will populate the selection list above.
Clinic: Click the magnifying glass icon to select your Clinic. The Immunization Registry export files can be created and separated per Clinic. This would be required if your State Registry identifies your organizations based on each of your Clinics and separate files need to be created for each clinic.
Provider: Click the magnifying glass icon to select your Provider. The Immunization Registry export files can be created and separated per each Provider. This would be required if your State Registry identifies each of your Providers and separate files need to be created for each of your providers.
NOTE: You must obtain from your state the correct identifier code and name that your state will need to recognize who has submitted the data. These consist of a Provider Organization ID code and a Provider Organization Short Name. Get those identifiers from your state to determine how the extract should be run in order to separate the data based on the organizations.
Save: Click this button to save the profile criteria. Please NOTE, when you select OK to close the window, any information changed in the registry profile or the section titled State Information (at the bottom right of the window) will be saved to the selected profile.
Select: Highlight a profile name and click Select to use that criteria for the registry export function. The selected profile becomes linked to this report if the report is memorized.
Include Internal Companies Only: Check this box to include only Internal Company records from the export file.
Select Vaccines for Export: Click the button to display the Select Activities for Reporting window.
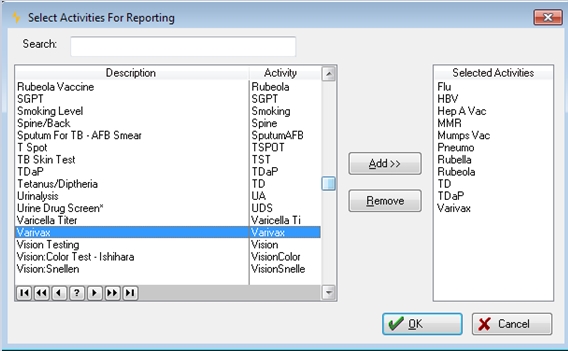
- In the Search box, type the name of a medical activity that you want to include in your report, then press the tab key.
- Highlight the activity in the left pane of the window, then click the Add button to select it, or simply double click it.
- Selected activities will appear in the right pane of the window. If one is selected incorrectly, highlight it in that right pane and click Remove.
- Add all the vaccine activities to the extracted to be reported to the State Registry.
- Click OK when all the desired activities have been selected.
- The maximum number of Selected Activities is 60.
Build Immunization Registry Extract File: Check the box to create the file.
Path for File: click the folder icon to indicate the destination folder for the file. Be aware of HIPAA requirements when handling the file. This pertains to the location you place the file, and to whom you give access to that file. Lastly, the person who submits the file to the state should be responsible for either saving it to a secure location or deleting it from the disk, depending upon your security policy.
Print Immunization Registry Extract Report: to print a report check this box.
Result Codes Included on Export: check the boxes if you wish to include any immunizations that were entered with these result codes. By clicking the "9 Administered Elsewhere" you will be sending any Vaccine history that was documented for your patients. By clicking the "R Refused/Declined" you will be sending any vaccines that were refused by your patients and the refused reason.
Include Varicella Immunity Status Information: This checkbox will become available only when the patient has at least one vaccine for export. Check the box to include ONLY the selected activity and the history as part of the export and the report.
Include Reported Immunities (History of Disease and Seological Evidence): When the option is checked , the Immunization Registry will pick up all Medical Conditions that are an Illness and recorded with the option "Immunity to be Reported to the State Registry" turned on (See Medical Conditions) and the status is set to Immune and the add date is within the selected date range.
Exclude Historical Immunization Record Source: Check this box to exclude the Historical Immunization Record Source from the export file.
Additional Options
Extract File Contains Only COVID-19 Vaccine Data: If you are running a COVID-19 only extract, check this box. If this box is checked, the following three fields should be entered. (For some states, the fields will pre-fill, others will need to enter the information.):
Financial Class Code
Financial Class Description
Financial Class Code System
Funding Source: The Funding Source may be used to record the default value for where the funds came from to cover the cost of the immunizations for this patient. This field must have a value selected in order to have Funding Source included in the export. Enter the Funding Source from the following dropdown selections:
Federal funds
State funds
Tribal funds
Public
Public VFC
Public non-VFC
Military funds
Private funds
other
unknown
Pandemic
Sending Responsible Organization : Enter a Sending Responsible Organization. The dropdown includes the following choices:
- Blank (do not send a Sending Responsible Organization)
- State Reg ID
- Admin at Location ID
Remove State Validations for Immunizations: Check this box to have the software remove the following validations for the report:
- Drug Dose Amount/Units is missing
- Mother's Maiden Name is missing
- Vaccine Lot number is missing
- Vaccine Manufacturer Code is missing
- Patient Address is incomplete
- Patient Phone Number is missing
The default is unchecked and this checkbox is available for memorization if that option is selected.
Age Range for Immunizations:
- Users may select a From and Thru Age range for the report. The default is Blank and both the From and Thru fields are available for memorization if selected.
- The From Age indicates the minimum age (by birth date) that the report will select. The Thru Age indicates the maximum age (in whole years) that the report will include.
- If either field is left blank the system will assume Zero (0) and not calculate a minimum or maximum boundary respectively.
Date Used to Calculate Ages:
This Date is selected by the user (calendar assist provided to the right) and is used by the extract as the default date to calculate ages. This field is not available for memorization; however, it is very useful in running the extract for previous periods. If the report is memorized, the date will default to the date the report is executed on the automated schedule.
State Info Panel
Click the State Info tab and the following window will display:
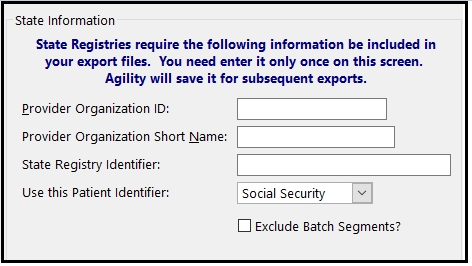
Enter the 3 required fields will be provided to you by your State Registry for identifying your organization in this file that will be extracted. This information will be included in the export file and will be stored in an Interface Profile record so that it will automatically be completed each time you run the export.
Provider Organization ID: enter the Organization Identifier provided to you by your State Registry.
Provider Organization Short Name: enter the short name provided to you by your State Registry.
State Registry Identifier: enter the State Registry Identifier provided to you by your State Registry.
Use this Patient Identifier: click the drop down list and select the Net Health Employee Health and Occupational Medicine Patient Identifier that you want to have sent in the extract file for each patient.
Exclude Batch Segments?: check the box if your State Registry does not want the additional batch HL7 segments to be included in the file extract, otherwise do not check the box. Most state registries do not want the batch segments included.
Memorize Each report Section
Click the Memorize Button to save these selections for this extract. Click the Memorize button again from the Memorized Reports window. Enter the Title and/or Subtitle or Desc fields to differentiate each report captured with the different variables. Click OK to save the report, then Close to return to the extract selection window.
Setup Batch Report
Once all of the Immunization extracts have been defined for each of your organizations variables as Memorized reports, then a Batch should be setup to run these file extracts. Each of the memorized reports will be added to the batch and then this batch will be added to the Automated Batch reporting function where the schedule is defined to run after hours without any user intervention. The user will click the Batch button and the following window will display:
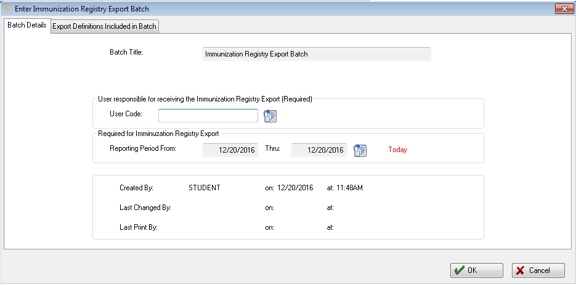
Batch Details tab
The Batch Reporting button controls both the setup and manual running of the batches from the same window. Only one batch can be setup to be run with all of the memorized reports for the registry export.
User Code: select the user code that will receive the report within the "My Reports" icon on the top tool bar. That user will be responsible for corrections of any error conditions that cause the extract file to fail from being created or individual immunizations from being sent.
Reporting Period From/Thru: The user will be able to select a specific time period when the export should be run. This time period can be different from the From/Thru Dates that were selected on each individual memorized report.
Export Definitions Included in Batch tab
Click on the Export Definitions Included in Batch tab and the following window will display:
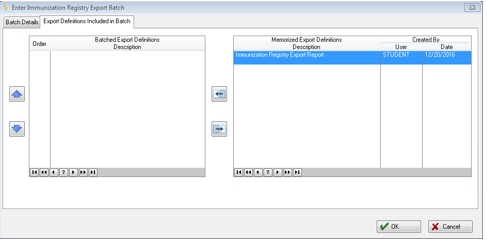
All of the memorized reports will display in the right pane of the window. To have them become part of the batch the user will simply move each report from the right pane to the left pane so that each one is included in the batch. When finished click the OK to save the information. If a report is changed or deleted, users will need to modify or re-create the report, save it, re-memorize it, and then make it part of the batch as described above.